There are typical folders in the entire operating system of the Windows family. This includes the My Documents folder. By default, it saves documents of various office applications, some components of video games. The name "My Documents" is standard for all versions of Windows operating systems. True, in some versions it may be called primitively "Documents". If you are not satisfied with this folder name, you can change it to another one.
You will need
- – Computer with Windows OS (XP, Windows 7).
Instruction
1. You need to rename the folder. On the desktop, as usual, there is not a folder, but a shortcut, one that allows you to quickly open it. The folder with documents is usually in a different place. If your computer is running Windows 7, then rename "My Documents" as follows. Open your system disk(by default, C, a different letter is assigned to the system drive very rarely).
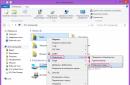
2. Next, open the Users folder. It contains two more folders: "General" and "Manager". Click on "Manager", and in it find "My Documents", then right-click on it. A context menu will appear. Select "Rename" from this menu. After that, enter a new name for the folder, press the Enter key, and it will be renamed.
3. Even after renaming the folder, the shortcut on the desktop will have a decrepit name. Remove this label. After that, right-click on the "My Documents" folder. Hover your mouse over the "Submit" line. An additional menu will appear, in which select "Desktop, create a shortcut."
4. To rename the My Documents folder on the Windows XP operating system, follow these steps. Open the system drive, then Documents and Settings. Select the folder that matches your account name. Then, accordingly, look for "My Documents". The renaming operation is no different from the case with Windows 7. In the context menu, it is primitive to prefer "Rename", after which set a new name for this folder.
The "My Documents" folder is intended by default to store all of the user's documents. Also, by default, the location of the My Documents folder is the C: drive with the operating system installed. Windows system. Changing this location is allowed by the standard Windows tools.

You will need
- – Windows 7/Vista.
Instruction
1. Press the "Start" button to bring up the main menu of the system and go to the "Documents" item to metamorphose the location of the "My Documents" folder.
2. Call the service menu by right-clicking on the "Documents" field and select "Properties".
3. Click the Folder tab in the Documents Properties window that opens and determine the current location of the My Documents folder. The default is drive:\Users\username\Documents, where drive is the name of the drive where OS Windows is installed and username is Account The used to log in.
4. Click the "Move" button to metamorphose the current location of the selected folder.
5. Select the drive and folder to save the Documents folder in the new dialog box.
6. Select " new folder» if you need to create a non-existent folder for storing user files in the top panel of the program.
7. Type the desired folder name and press the Enter key to confirm the command.
8. Highlight the folder you want to transfer documents to and click the "Select Folder" button at the bottom of the dialog box.
9. Return to the Documents Properties window and click the OK button at the bottom of the Folder tab to confirm your selection.
10. Wait for the new "Move Folder" dialog box to appear and click "Yes" to confirm the execution of the move information command.
11. Wait until the end of the process of transferring data from the current folder "My Documents" to the selected folder. Transfer time depends on the amount of information in the folder and the speed of your computer.
12. Execute a mouse click on the "Documents" icon to check the display settings of the completed data transfer operation and make sure that the location of the "My Documents" folder is indeed changed.
You have probably noticed that the operating system mechanically assigns a specific name to hard drives. disks. It is possible to change the mechanically assigned name with the support of the built-in Windows utility.

Instruction
1. Click the "Start" button and right-click on the "My Computer" line. Select "Manage" from the menu that appears.
2. In the "Computer Management" window that opens, click on the "Manage disks and". A list of all hard drives installed on your computer.
3. Right click on the disk title which you want to change. In the context menu, select "Change title and drive path" to open the settings window.
4. Click on the "Change" button. In the "Assign drive letter" window that opens, select the desired letter from the drop-down list. Click on the "OK" button. That's it. Taking advantage standard utility operating system, you can easily change title hard drive.
Note!
If the disk is a system disk (the operating system is installed on it), then it will not be possible to change the name of the disk.
Useful advice
In the Windows XP operating system, "My Documents" contains several more folders with the user's personal files (music, pictures, etc.). Renaming a system folder does not affect its contents in any way, so you can do it without fear.
Each operating system of the Windows family has standard folders. This includes the My Documents folder. By default, it saves documents of various office applications, some components of video games. The name "My Documents" is standard for all versions of Windows operating systems. Although in some versions it may simply be called "Documents". If you are not satisfied with this folder name, you can change it to something else.
You will need
- - Computer with Windows OS (XP, Windows 7).
Instruction
You will need
- - Windows 7/Vista.
Instruction
- Changing the location of the My Documents folder in Vista and Seven
- how to change properties in windows 7
My Documents is a system folder. In windows 7, the folder may be called Documents. It stores user data, such as video game files. If the name of the folder does not suit you, then you can change it to something else. Now we will talk about how rename folder my Documents. For Win 7: Open the Users folder, there we see two folders: General and Administrator.
Open Administrator. Right-click on the My Documents folder. Choose Rename. Change the name and press the key Enter. For Win XP: you need to open the drive (C:), then Documents and settings. Select a folder with the name of the system administrator. This is the My Documents folder. And you need to do the same as in Windows 7.
How to create a network folder? very simple. Open my computer. in the right section hard drive press the right mouse button. Now you need to select Create, then select a folder. Enter the name, copy the necessary files there. Next, go to General Access, and select the Specific users option. Click on Users and on Everyone. Click Sharing again and select Apply to files and subdirectories. Now you need to click Finish.
You can drop the necessary files into the folder and store them there, so that later it would be more convenient to find them. How to drop into a folder? To do this, we find the file we need and simply drag it to the folder. If there are a lot of files, then select them and also drag them. However, this is not the only way. You can select the desired files, right-click on them and select Copy (or Ctrl + C). Now we go into the folder, click on an empty space in it and after clicking with the right mouse button, click Paste (or Ctrl + V).
Almost every user has encountered the problem of deleting folders or files. Especially those who have only recently started working at a computer. How to delete a folder from administrator? To delete a folder that cannot be deleted, you need to download the Unlocker program from the Internet. Next, go to the folder with the Unlocker archive. We install the program on the computer. In Unlocker, select the desired folder, and it says what processes do not allow you to delete the folder. Before deleting a folder, you can close all processes that are blocking actions. If this fails, then simply delete the folder through the program.
If the folder is not specifically deleted, it will be possible to restore it. Just for safety, you need to make an image. To do this, download the program Nero Burning ROM or it can already be installed with windows. How to create an image from a folder? We go into the program, select File, then Create. Or hot keys Ctrl + N. Choose your format, CD or DVD.
Choose New. Select the folder whose files will be included in the image. Select the required files. Add files that will be included in the image. Right-click on the selected files and select Copy To Compilation. Press the Record button. Then Ctrl + B and press Burn. Select the required options. We are waiting for the end of the recording and click OK.