Wireless networks are one of the most convenient technologies. Connecting to the Internet from cafes, while traveling and generally outside the home - all this is possible thanks to Wi-Fi. The question of how to connect to Wi-Fi in a public place or, for example, distribute the Internet yourself, is quite relevant. Therefore, this article is about how to enable an access point (Access Point or AP) on a Windows laptop.
It is worth saying that this feature is built-in only on laptops, that is, for stationary PCs, you need to buy an external adapter. It is a USB flash drive or expansion card with antennas like a router.
Let's take a look at the different types of events. In general, there are only two. We are talking about an existing wireless network or creating your own access point to connect other clients. There are few ways to achieve any of these goals, but they are not difficult in themselves, so all the instructions fit into this article.
How to make a Wi-Fi access point from a laptop without third-party programs, you will learn in the following video:
Windows 7 laptop - setting up an access point
How to make a Wi-Fi hotspot? Configuring a Windows 7 Wi-Fi hotspot starts by looking for this icon, which looks like a computer with a plug. Use the right mouse button (RMB) to get to the Network and Sharing Center. Through it, you can control the functions of the network card and not only.
Select "Set up a new connection" (this line is located approximately in the middle), then "PC-PC network" (sometimes it may be written "computer").
Set the parameters for the connection, which you will distribute to other users in the future:
- “Network name” is its name, it will be visible to connecting clients and just devices that have a wireless connection adapter.
- "Security type" is the way data transmission is encrypted. WPA and its various variations are now the most reliable way.
- "Security key" is a parameter that defines a password. It is he who needs to be known by those connecting in order to establish a connection with the access point.
Now, if you left-click on the familiar icon (the one on the bottom right), you'll see several different connections. Click on the RMB adapter you created to get to the properties, and in one of the submenus find "Allow other users ..." (at the top of the window). It is thanks to this parameter that you will be able to share your Internet. Feel free to click on the flag.
You have created a connection with unique parameters and the ability to share Internet access. The main thing is to maintain a wired Internet connection (and remember to tell other users the password for your network). So everything will work.
Method with cmd (command line)
This set of Wi-Fi setup commands is universal for seven and ten. Command line is launched through a combination of Win and R, then type "cmd" and press Enter.
You will see a black terminal where you need to enter
netsh wlan set hostednetwork mode=allow ssid=New Name key=New Pass keyUsage=persistent.
Let's go through the meanings of each Wi-Fi setting:
- The name is set through the "SSID" (recall that this is the visible name of your connection).
- The "key" field is for a password (at least eight characters).
- "keyUsage" is an attribute of persistent ("persistent") use of the password, that is, the set password will be saved for subsequent connections.
- The "mode" parameter allows ("allow") the inclusion and further use of the network by users (the reverse command is the value "dissalow").
To turn off the dot, it is not very convenient to enter all this every time, changing only “mode”, so shorter and more intuitive lines are given below. You can start the access point through the command "". To disable, replace " start" on " stop».
Thanks to the last two commands, you will not have to re-enter the parameters if you want to turn off the distribution of the Internet.
With a script
After turning off the laptop, your Wi-Fi point will stop working, however, when you turn it on, it will not start automatically. Therefore, it makes sense to create a so-called script (or script) that will include an Access Point in just a couple of clicks. This will save you from unnecessary actions with the Command line.
Open Notepad and type in the following line: netsh wlan start hostednetwork. You need to save in .bat format, not .txt. To make sure that your actions are correct, you need to look at the shortcut of the saved file. If this is a pair of gears, and not a notebook sheet, then everything is done correctly. By running this script as an administrator, you will be able to enable your dot without re-typing text in command line.
The script for disabling the point differs in only one word - “start” must be replaced with “stop”, further actions are repeated. Now you have two scripts to avoid unnecessary and easily manage your AP.
Connecting to a Wi-Fi hotspot
How to find an existing access point? You will again need the network connection icon at the bottom right, but now click on it with LMB. You will see a list with available connections and Wi-Fi networks (if you have a PC with a wireless adapter or a laptop). It is enough to select the network you need (or the one from which you know the password). There are also hidden networks (usually displayed at the bottom of the list). Then you will also need to know the exact name (ssid) to connect.
This method is suitable for the latest releases of the Windows family of operating systems, but only if the machine has a Wi-Fi adapter (it is built-in in laptops, you need to buy it separately for stationary PCs).
Access point software setting
How to create an access point programmatically? Best Program for these purposes - Connectify Hot Spot PRO. The settings are intuitive and simple.
“HotSpot Name” in the “Settings” submenu is the ssid (name) of your wireless network, “Password” is the password, respectively. In the "Internet to Share" item, you must select the adapter to which a wired Internet connection is connected.
MyPublicWiFi is suitable for Windows users of any version older than seven. The interface looks even simpler, and the settings have not become more complicated.
Switch Virtual Router is also not difficult - the same parameters and intuitive settings, besides, it is in Russian.
See also a video tutorial on creating an access point on a laptop using the Switch Virtual Router program:
Access point connection errors
Sometimes users have problems connecting to someone's hotspot. If you are sure that there are no errors in the settings, it is worth checking your firewall - or the firewall built into all versions of Windows.
Find the firewall settings on your device (for example, type in the search), and then in the "Firewall with Advanced Security" item, find the "Properties" sub-item just below.
In the window that opens, allow incoming connections on at least the shared profile. You can open connections in all tabs, but it's best not to make your system too vulnerable. Moreover, it is not necessary to disable the firewall completely.
Each of the methods describing how to create an access point is quite convenient and easy to connect. The settings are practically the same everywhere, moreover, they are easily set by the "owner" of the connection.
As for the security settings of the point you created, do not turn on your AP again. The less prying eyes your device sees, the better. Although modern encryption methods help protect against intruders, it does not always save you from password cracking.
Very often on the Internet you can find questions about Wi-Fi networks. The network policy of old OS versions is different from the new ones. Also, the design of the dockers is different, and sometimes it is difficult to find familiar old tools. Setting WiFi hotspots access in Windows 7 also changed. So today I will tell you about how to create a wireless connection.
In Windows 7, the developers found it necessary to put protection on the network. Undoubtedly, this can protect your computer from being hacked, but it also brings some inconvenience. Therefore, before setting up, you need to disable this protection in order to have access to folders and files over the network. To do this, click on the network icon on the Windows working panel and select "Network and Sharing Center".
Figure 1. Network and Sharing Center.
In the network management window, select the settings for sharing settings. And change the advanced sharing options.

Figure 2. Choose a homegroup and sharing options.
In the window that opens, turn off password protection at the very bottom of the settings and save the changes.

Fig 3. Disable password protection.
After that follows setting up a wifi hotspot in windows 7. We return to the network control center. In the left menu of this center, select: Wireless Network Management and click "Add". A window should open with a choice of two types of network settings. The first is to connect to an access point, the second is to create an access point.

Fig 4. Connecting to a wireless network manually.
Therefore, you must select the second one: "Create a computer-to-computer network." Click next and start setting up. Set the name of your network, for example: "MyNetwork". Next, let's talk about the types of security. WEP type - transmits the encryption key to each computer as claimed Windows developers WEP type is easy to crack. But if you do not set up a network in a corporate company or office, then there is no point in hacking you. For regular home network this type will do. WPA requires user authorization, it is more secure. The last type is Open, which comes without a password. For example, let's choose WEP and set a password. Save network settings.

Fig 5. Network setup.
After that, the working point is ready! Let's check it and try to connect from another device. I used a second laptop to connect. If you have a dedicated button for turning on Wi-Fi then check if it is enabled. We look at the available points and connect to the previously created one.

Fig 6. SettingWi-Fi hotspot inWindows 7.
In the window that opens, enter the password that was set during setup.
How to create a WiFi hotspot using Windows 7. Instructions, step by step with illustrations. Although people are mainly interested in the question of how to make a laptop a wifi access point, it really does not matter whether it is a laptop or a regular desktop computer. Creating a wifi hotspot is the same in both cases.
Similar articles for other operating systems:
How to create a WiFi hotspot on Windows 7
We need to create a software wifi router based on Windows 7 that will receive the Internet in some way and be able to distribute this Internet via wifi.
What do we need.
- Windows 7 Basic or older. Windows 7 Starter (initial) will not work. More precisely, on Windows 7 Starter, you will have to solve the routing issue with the help of a third-party program ( for Windows 7 Starterseparate note at the end of the article).
- Old wifi adapter. For example, for this article, a TP-Link TL-WN722NC USB wifi adapter was used.
- Internet connection. For this article, a GSM connection was used through the MTS operator (MTS USB modem). But it can be any connection - PPPoE, VPN, Dail-Up, Ethernet, WiFi.
The first step is to install a wifi adapter, if it is not already installed, and make sure that it is turned on and working.
After that, you need to check if the "WLAN AutoConfig Service" service is running. Usually its start mode is "Manual", which means it can be stopped. If you plan to use the access point you are creating permanently, then it is better to set this service to the "Automatic" startup mode.
You also need to check that the "Internet Connection Sharing (ICS)" service also has the "Automatic" startup mode.
These checks are done through "Control Panel - Administrative Tools - Services".
After that, you need to open the Windows console (cmd.exe) with administrator rights. This can be done through the menu "Start - Programs - Accessories - Command Prompt", then the right mouse button and "Run as Administrator".
In the console, type and execute the command:
netsh wlan set hostednetwork mode=allow ssid="winap" key="123456789" keyusage=persistent.
Instead of winap And 123456789 enter your access point name and password:
Note. Important! The password must be at least 8 characters long, this is a requirement for the WPA2 security type that Windows uses when creating an access point. It is better not to use Cyrillic in the password. Letter case matters - A And A they are different characters!
Next, check that the connection for the access point has been created. Open "Start - Run - ncpa.cpl" and after opening the "Network Connections" window, in this window find a wireless connection for which no physical adapter is specified:

Press the right mouse button, then "Properties" and look there - it should be "MicroSoft Virtual Miniport Adapter":

At the same time, you can remove unnecessary connections and protocols for this.
Immediately rename this connection in ncpa.cpl - for example, to "winAP":

Further, here, in ncpa.cpl, you need to share (enable Windows ICS) an Internet connection. Select this connection, right button - "Properties", tab "Access". Enable ICS and specify the connection to which the Internet will be distributed - on the wifi connection of the access point ("winAP"):

Now you need to connect to the Internet. Or reconnect if the connection was established earlier.
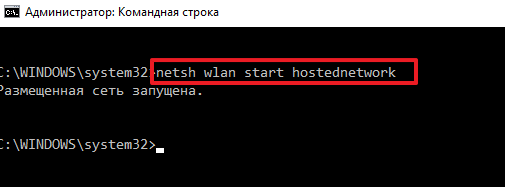
After that, in the console, type and execute the command:
netsh wlan start hostednetwork.
Everything, the access point should already work. Now you can connect the client to this access point (this illustration is from the client computer):

How to connect wifi client on:
- Laptop (or computer) under Windows - WiFi setup in Windows 7.
- Laptop (or PC) under Linux - Laptop (or PC) under Ubuntu.
Client connected:

On the computer where the access point is running, you can check its status. To do this, enter the command in the console:
netsh wlan show hostednetwork

It can be seen that one client is connected.
Stopping an access point with a command netsh wlan stop hostednetwork
Complete destruction of the access point with the command netsh wlan set hostednetwork mode=disallow
If you want the access point to turn on automatically when Windows boots, then the start command must be added to autorun. Talking about the team netsh wlan start hostednetwork. The command can be written in a cmd script, it is necessary to specify "Run as Administrator" in the properties of this script. Then include the script in autorun.
It is necessary that the Internet connection is also established when Windows starts. Otherwise, you will have an access point, but there will be no Internet through it.
Of course, this is a very simple access point. But everything is at hand. No third party programs needed. Only Windows 7. And everything is configured in a couple of minutes. Yes, there are programs like Connectify and Virtual Router. However, you need to understand that they only do the work that is done by two commands in the Windows console. These are just additions to the functionality of Windows 7. It's easier to write two commands in the console than to download and install some kind of stray.
Someone might say that in this option, there are not many features that an access point should have. Well, yes, it is. Only this is an option when you need to make a wifi router very quickly and without problems. And just such an opportunity Windows 7 provides - with a minimum of gestures, what is called "on the knee" to create an access point.
And if your needs are wider and deeper, if you need an access point for every day, or in complex configurations, then you don’t need to use Windows, but buy a decent, or even a good WiFi router. A decent WiFi router now costs less than a thousand rubles. And in such a situation, sculpting a structure based on a computer and Windows is somehow absurd.
Another thing is if an access point is needed once a month, for a day or for a couple of days. Or on a business trip. Or on vacation. This is where Windows comes to the rescue. You can quickly distribute the Internet via laptop WiFi to a tablet, smartphone or other laptops.
But if there is a need to make a permanent access point on the computer, then it is better to do it under Linux. As actually it is implemented in WiFi routers. For example, as in this article - Access point on Ubuntu.
hotspot on windows 7 not working
No need to swear at Microsoft, on Windows - in general, look for the guilty on the side. The problem in such cases Always on your own computer (or laptop). It could be:
- WiFi adapter driver on which you create an access point.
- The WiFi adapter itself.
- You did something wrong.
- Any "left" services or drivers / programs that use the WiFi adapter or USB port (if your adapter is connected via USB).
- You have Windows 7 Starter.
- One of the required services has stopped, for example, see the article "Windows 7 Routing and Remote Access service stops".
For example, during startup windows driver WiFi adapter can put the adapter into standby mode. And when Windows starts the service hosted network the adapter does not wake up.
With a normal WiFi adapter and if you have not polluted your Windows with crooked programs and drivers, everything will work fine.
In general, always look for the source of the problem on your computer.
WiFi network protection
Access point on Windows 7 Starter (initial)
Microsoft messed with her. ICS is blocked on it, and you can make an access point as such. Paradox. Why do we need a hostednetwork mechanism if there is no routing? Whatever it is, do wifi hotspot access on Windows 7 Starter (initial) is possible. You just need to find a program with which to perform routing between the Internet and winAP interfaces. There are many options here, for example, you can use a proxy server, such as 3proxy.
Ivan Sukhov, 2013, 2014
Now wireless network Wi-Fi is supported by a huge variety of devices, from wrist watch to TVs. Typically, these devices use wifi router. But, if there is no such router, then you can get by with an ordinary laptop or computer with a Wi-Fi adapter. In this article, you will learn how to create a Wi-Fi hotspot on a computer or laptop with an operating system. Windows system 7 or Windows 10.
Creating a Wi-Fi Hotspot on Windows 7
First, let's look at a more complicated way to create a Wi-Fi hotspot. This method is based on using the command line, so it works fine in both Windows 7 and Windows 10. Although in the case of Windows 10, it is better to use the second method, which is described at the end of the article.
So, in order to create a Wi-Fi hotspot based on a Windows 7 computer, you need to open a command prompt with administrator rights. To do this, open the "Start" menu, enter the phrase "Command Prompt" in the search, right-click on the found program and select "Run as administrator". This is the easiest option though.
After the command line is launched, you can start creating a Wi-Fi access point. To do this, run the following command:
Netsh wlan set hostednetwork mode=allow ssid="wifi_name" key="wifi_password" keyUsage=persistent
Please note that this command has parameters "wifi_name" and "wifi_password". This is the name of the Wi-Fi access point to be created and the password to connect to it. In order to create a secure access point, it is better to change these parameters.
After executing the specified command, a message should appear on the command line to allow the hosted network mode, as well as to change the SSID and passphrase.

Now you need to run a command that will only launch the previously created Wi-Fi access point:
netsh wlan start hostednetwork
After executing this command, you should get the message "Hosted network is running". If you get the message "Failed to start the hosted network" then you have a problem with your Wi-Fi adapter. It may be disabled or not working due to driver issues. Solve the problem with the Wi-Fi adapter and run the "netsh wlan start hostednetwork" command again.
At this point, the Wi-Fi hotspot has already been created and is working. You can even connect to it, but you won't be able to access the Internet. In order to enable Internet sharing, you need to open the "Network Connections" window. To do this, you can press Windows-R and run the "ncpa.cpl" command.

In the "Network Connections" window, you need to find the connection through which you connect to your Internet provider. Right-click on this connection and go to "Properties".
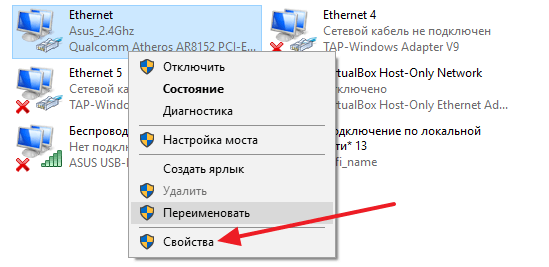
Next, you need to go to the "Access" tab and enable the "Allow other network users to use this computer's Internet connection" option there. Also here you need to open the drop-down list and select the Wi-Fi connection that was created earlier by executing the commands. In the screenshot below, this connection is called "Connection by local network 13", but in your case the name will be different.

This completes the creation of a Wi-Fi access point on Windows 7. Close the window with the "Ok" button and check how Wi-Fi works. To connect to the created access point, use the password you specified earlier.
It should be noted that the "netsh wlan start hostednetwork" command must be run after each Windows 7 startup. In order to stop the access point, use the "netsh wlan stop hostednetwork" command.
Create a Wi-Fi Hotspot on Windows 10
If you have Windows 10, then you are in luck, in this operating system The process of creating a Wi-Fi hotspot is greatly simplified. Here you do not need to execute any commands, everything is done in a couple of mouse clicks.
So, in order to create a Wi-Fi hotspot on a Windows 10 computer, you need to open the Options window. To do this, you can open the Start menu and click on the gear icon. You can also right-click on the Start button and select Settings from the menu that appears.

In the "Settings" window, immediately go to the "Network and Internet" section.

And then open the subsection "Mobile hot spot". Here, at the very top of the window, there will be an available “Mobile Hot Spot” function. Enable this function and the Wi-Fi hotspot will be created automatically.

Below you can select the connection to be shared via the Wi-Fi hotspot, and view or change the hotspot name and password.
Good day, blog visitors.
Even today, many computer users cannot imagine their lives without the Internet. And now it is not only on computers, but also on smartphones, tablets, TVs. Wireless technologies are becoming more and more popular, and this mainly concerns getting the opportunity to get into the "world wide web" anywhere in the room. This task is perfectly handled by special devices. But what to do if such equipment is not provided? Later in the article I will tell you how a Windows 7 wifi access point is organized on a laptop in various ways.
general information
Wi-Fi technology provides the ability for all users to combine multiple computers and additional peripherals into home groups. This allows you to increase the speed of information transfer, speed up communication, improve the workflow.
Basically, such a system is organized through special equipment - a router. But this device is not always at hand. But what if you urgently need to establish a connection with a new component or access the Internet? Fortunately, all modern laptops have a built-in Wi-Fi adapter. It is this element that can be configured as a wireless communication module.
There are many programs for this. In addition, the operating system itself provides some tools that allow you to accomplish your plan.
Built-in features
It should be said right away that this method does not require users to install any additional software.
This method will help you get a wireless access point without a router - it will be configured on a laptop. In this case, the device both distributes and receives a signal.
And the first thing you need to check for this is the drivers for the module we need. They must be the latest version. If this is not the case, the function we need may not be supported at the software level.
Internet distribution can be organized through the command line or using the "comp-comp" connection. Either way, the result will be the same.
The main thing is to do everything step by step, so as not to miss something.
Command line
To achieve the desired result, you must perform a number of actions:

In some cases, users may need to share information. To do this, do the following:

If you suddenly get a limited connection, but you need to set up the Internet for all participants, you need to do a few steps:

Now the access point is designed not only for computers or laptops, but also for phones and tablets.
"comp-comp" connection
The procedure itself is simple. To do this, do the following:

If after that the device does not distribute the Internet, rebooting the equipment may help. Otherwise, check your settings.
Programs
This method can be called one of the simplest. To do this, there are many applications that are downloaded for free. In general, work in such programs comes down to four main actions:
- Name entry.
- Security choice.
- Key entry.
- Selecting a connection to access the "World Wide Web".
It is worth noting that if you are planning to do this using a desktop computer, it must have the appropriate components. So, for example, the usual LAN card won't fit. It will be possible to implement the plan through a USB modem connected to an external port.
I hope you can easily achieve your goal. Subscribe and you will always know what to do with your computer in any situation.